

As the leaves turn golden and the air crisps up, nothing screams fall quite like pumpkin cheesecake with gingersnap crust. This decadent treat blends creamy pumpkin spice filling with that snappy, spiced cookie base—think holiday magic in every bite. In this guide, we’ll dive into why it’s the ultimate autumn dessert, unpack ingredients and techniques, troubleshoot pitfalls, explore variations like mini pumpkin cheesecakes or gluten-free twists, and share storage smarts, plus FAQs for bakers of all levels. Get ready to wow your Thanksgiving crowd with tips drawn from top recipes that make this spiced pumpkin cheesecake foolproof and irresistible.
Pumpkin Cheesecake vs Traditional Pumpkin Pie for Holidays
Why choose pumpkin cheesecake with gingersnap crust over pie? First off, it’s richer yet lighter, skipping the custard-like heaviness for silkier texture that chills overnight for peak flavor. Additionally, pies demand precise crimping and venting, while this bakes evenly in a water bath, dodging cracks with ease. In short, for holidays like Thanksgiving or Friendsgiving, it serves more slices without the mess—ideal when you’re juggling turkey and sides. No wonder it’s a fall cheesecake favorite that outshines the classics every time.
Key Ingredients for Pumpkin Cheesecake with Gingersnap Crust

Best Pumpkin for Pumpkin Cheesecake (Canned vs Homemade Purée)
First off, canned pumpkin purée shines brightest for pumpkin cheesecake. It’s smooth, thick, and consistently sweet without watery bits that homemade often brings. Moreover, brands like Libby’s pack pure pumpkin—no spices or fillers—to let you control the pumpkin spice kick. However, if you’re up for it, roast fresh sugar pumpkins for deeper flavor; just strain well to avoid a soggy filling. Consequently, this choice keeps your pumpkin cheesecake with gingersnap crust velvety and foolproof.
Choosing Cream Cheese, Sugar, and Spices for a Silky Filling
Next, full-fat cream cheese forms the rich base—go for bricks at room temp to blend lump-free. Additionally, granulated sugar sweetens without graininess, while brown sugar adds molasses depth for that fall vibe. As for spices, cinnamon, ginger, nutmeg, and cloves mimic pie but amp up the tang; start with 1-2 tsp each. In fact, these picks ensure your pumpkin cheesecake stays creamy, not grainy.
Gingersnap Crust Essentials: Cookies, Butter, Nuts, and Optional Add-Ins
| Ingredient | Amount (9-inch pan) | Purpose | Tips |
|---|---|---|---|
| Gingersnap cookies | 2-3 cups crushed (about 40 cookies) | Spicy, crunchy base | Use crisp brands like Nabisco; avoid soft ones |
| Unsalted butter | 5-6 tbsp melted | Binds crumbs | Brown it lightly for nutty flavor |
| Granulated sugar | 2-3 tbsp | Sweetens crust | Optional for extra snap |
| Pecans or walnuts | ½-1 cup chopped (optional) | Texture boost | Toast first for aroma |
| Salt | Pinch | Balances sweetness | Enhances ginger pop |
Therefore, this lineup crafts a sturdy gingersnap crust that holds up to the creamy pumpkin cheesecake above.
Perfecting the Gingersnap Crust for Pumpkin Cheesecake

Ideal Gingersnap Cookies and How to Crush Them Evenly
To start, pick sturdy gingersnaps—think thin, snappy ones loaded with spice. Consequently, food processor pulsing yields even crumbs fast; otherwise, seal in a bag and smash with a rolling pin. Moreover, aim for fine texture like wet sand, not powder, for the best hold. This step sets your pumpkin cheesecake with gingersnap crust apart from soggy disasters.
Balancing Crumbs, Butter, and Sugar for a Crisp, Sturdy Crust
Next, mix 2 cups crumbs with 5 tbsp melted butter and 2 tbsp sugar—test by squeezing; it should clump nicely. Additionally, press firmly into a parchment-lined springform pan using a glass bottom for even layers. As a result, blind-bake at 350°F for 10 minutes to set without burning. Thus, you’ll dodge crumbly edges in your pumpkin cheesecake.
Prebaking, Cooling, and Troubleshooting Soggy or Crumbly Crusts
After baking, cool fully before adding filling—heat warps the structure. Furthermore, if sogginess strikes, next time wrap the pan in foil for water baths or chill crust overnight. On the flip side, too crumbly? Up the butter by a tablespoon. In short, these tweaks guarantee a pro-level gingersnap crust that elevates every pumpkin cheesecake slice.
Making the Silky Pumpkin Cheesecake Filling
Softening Cream Cheese and Mixing for a Lump-Free Batter
For a smooth Pumpkin Cheesecake filling, start with full-fat cream cheese at room temperature. Consequently, it blends faster and avoids stubborn lumps that can ruin that silky bite. Moreover, cut the blocks into smaller chunks so your mixer doesn’t have to work as hard. Then beat the cream cheese on medium-low until it’s creamy and glossy, scraping the bowl often to catch any bits stuck on the sides.
After that, add sugar slowly so it dissolves into the cream cheese instead of sitting gritty in the mix. Because high speed whips in air, keep the mixer at low or medium-low. As a result, your Pumpkin Cheesecake bakes dense and creamy instead of puffy and prone to cracks. Finally, make sure the mixture looks smooth and thick before you move on to the wet ingredients.
Adding Pumpkin Purée, Spices, and Dairy Without Overmixing
Once the cream cheese base is ready, whisk pumpkin purée, eggs, and dairy (usually sour cream or heavy cream) together in a separate bowl. This simple step helps everything blend in quickly, so you don’t overmix the batter. Then pour this pumpkin mixture into the cream cheese and beat on low just until combined. Because pumpkin is moist, it loosens the batter, giving that classic custardy, spiced pumpkin cheesecake feel.
At this stage, stir in cinnamon, ginger, nutmeg, and a touch of cloves or allspice. Since spices bloom as they bake, a little goes a long way toward that warm fall flavor. For extra depth, a splash of vanilla and a pinch of salt balance the sweetness. Therefore, your Pumpkin Cheesecake filling ends up rich, fragrant, and ready for a slow, even bake.
Achieving the Right Texture: Eggs, Mixing Speed, and Avoiding Air Bubbles
Eggs are the backbone of cheesecake texture, so add them one at a time on low speed. Because eggs trap air easily, slow mixing keeps the batter dense and prevents puffing and cracking in the oven. Additionally, stop mixing as soon as the last egg disappears into the batter; more time just means more air. If you like, gently tap the bowl on the counter to bring bubbles to the top.
Right before pouring the filling over the cooled gingersnap crust, give it a final stir with a spatula. This simple move releases any sneaky air pockets and evens out the texture. Then, once it’s in the pan, swirl the top to smooth it so it bakes level. As a result, your Pumpkin Cheesecake comes out lush, tight-crumbed, and picture-perfect all the way through.
Baking Pumpkin Cheesecake with Gingersnap Crust Like a Pro
Pan Prep: Springform Size, Lining, and Foil Wrapping
For most recipes, a 9-inch springform pan is the gold standard for Pumpkin Cheesecake. It gives enough height for a generous filling without risking overflow. Moreover, lining the bottom with parchment and lightly greasing the sides helps the cheesecake release cleanly. Because cheesecakes can leak, it’s smart to wrap the outside of the pan in a double layer of heavy-duty foil before it goes near water.
After pressing in and prebaking the gingersnap crust, let the pan cool slightly before adding the filling. This simple pause prevents the hot crust from melting the batter edges too fast. Additionally, place the wrapped springform in a larger roasting pan if you plan to use a water bath. Therefore, you’ll be set up for gentle, even baking that treats the creamy filling with care.
Water Bath vs Dry Bake: Preventing Cracks and Overbaking
A water bath might sound fussy, but it’s one of the best tricks for a crack-free Pumpkin Cheesecake. By surrounding the pan with hot water, the oven heat stays moist and steady, so the edges don’t overcook while the center is still soft. Simply pour hot tap water or boiled water into the roasting pan until it reaches halfway up the springform sides. Because of the foil wrap, the crust stays dry while the filling bakes smooth.
However, if you skip the water bath, you can still protect your cheesecake. First, bake at a slightly lower temperature and avoid opening the oven door too often. Then, when the edges look set but the center still jiggles like Jell-O, turn off the oven and leave the door cracked. As a result, the Pumpkin Cheesecake cools gradually and is less likely to split.
Bake Times, Doneness Checks, and Gradual Cooling for a Smooth Top
Most 9-inch Pumpkin Cheesecakes bake for about 60–75 minutes, though every oven is a bit different. Instead of relying only on time, watch the texture: the outer 5 cm or so should look set, while the center still wobbles gently when you nudge the pan. Because cheesecakes continue to cook as they cool, pulling it at this stage prevents a dry, chalky crumb.
After turning off the oven, let the cheesecake sit inside for 30–60 minutes with the door slightly open. Then move it to a wire rack and cool to room temperature before chilling for several hours or overnight. This slow cool-down helps the top stay smooth and avoids sudden shrinkage and cracks. Ultimately, this patient process gives your Pumpkin Cheesecake with gingersnap crust that classic, bakery-style finish.
Chilling, Serving, and Storing Pumpkin Cheesecake

Why Overnight Chilling Improves Flavor and Texture
After baking, pumpkin cheesecake needs time to rest and firm up. Consequently, chilling overnight lets the flavors meld beautifully—the spices deepen while the gingersnap crust softens just enough to pair perfectly with the creamy top. Moreover, this pause helps the filling set into that dreamy, sliceable texture without any wobbly mess. As a result, your pumpkin cheesecake with gingersnap crust tastes richer and holds its shape like a pro baker’s dream.
Slicing Cleanly and Serving at the Ideal Temperature
To slice pumpkin cheesecake neatly, dip a sharp knife in hot water and wipe it dry between cuts. This simple trick glides through the crust and filling for clean edges every time. Additionally, serve it chilled or at cool room temp for the best bite—too warm, and it gets gooey. Therefore, guests rave about those perfect wedges at Thanksgiving dinners.
How to Store, Refrigerate, and Freeze Pumpkin Cheesecake Safely
For short-term storage, cover pumpkin cheesecake tightly and fridge it up to 5 days. However, for longer hauls, wrap slices in plastic then foil and freeze for 2-3 months. When ready, thaw overnight in the fridge to keep the gingersnap crust crisp. In short, these steps make your fall dessert last through the holidays without losing a bit of charm.
Toppings and Garnishes for Pumpkin Cheesecake with Gingersnap Crust
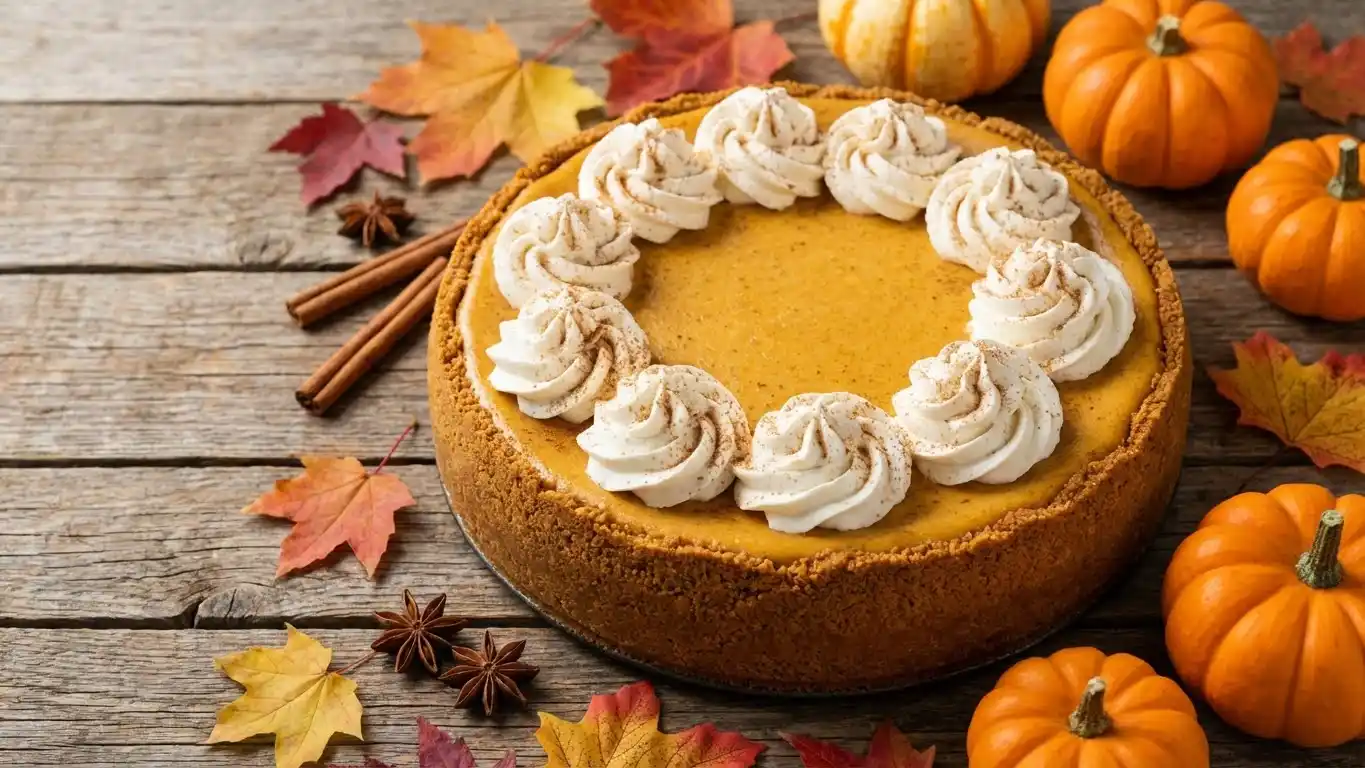
Whipped Cream, Caramel Sauce, and Nutty Toppings (Pecans, Walnuts)
No pumpkin cheesecake is complete without fluffy whipped cream dollops. Consequently, homemade with a touch of vanilla and powdered sugar adds airy lightness to balance the rich filling. Moreover, drizzle warm caramel sauce for sticky sweetness, then sprinkle toasted pecans or walnuts for crunch. As a result, these classics turn simple slices into indulgent treats that scream fall feast.
Simple Decorations: Gingersnap Crumbs, Spice Dusting, Chocolate Drizzle
For easy flair, scatter extra gingersnap crumbs around the edge—they echo the crust’s spice. Additionally, a light dusting of cinnamon or nutmeg gives that cozy, bakery-fresh look. If you want fancy, zig-zag melted chocolate for contrast against the orange hue. Therefore, these no-fuss touches make your pumpkin cheesecake with gingersnap crust pop on any dessert table.
Styling Tips for a Showstopping Holiday Dessert Centerpiece
Start with a cake stand to elevate your pumpkin cheesecake. Then layer on toppings in the center, letting them spill artfully. Because fresh pomegranate seeds or mini pumpkins add color pops, they tie into autumn vibes perfectly. Ultimately, snap a photo before serving—it’s too pretty to resist sharing with friends and family.
Variations – Mini, No-Bake, and Gluten-Free Pumpkin Cheesecake
Mini Pumpkin Cheesecakes with Gingersnap Crust for Parties
Who doesn’t love bite-sized treats? Consequently, mini pumpkin cheesecakes with gingersnap crust shine at parties—easy to grab and no slicing drama. Moreover, press crumbs into muffin tins, fill halfway, and bake shorter for perfect pops. As a result, they’re great for Friendsgiving or Halloween bashes, where guests snag one (or three) without guilt.
No-Bake Pumpkin Cheesecake with Gingersnap Crust for Easy Prep
Short on oven time? No-bake pumpkin cheesecake saves the day with a chill-only method. First, mix the creamy filling with gelatin or whipped topping for set power. Then layer over your trusty gingersnap base and fridge overnight. Therefore, it’s a fuss-free win for hot days or busy bakers craving that spiced pumpkin cheesecake vibe without heat.
Gluten-Free and Dairy-Light Options Using Alternative Cookies and Ingredients
Gluten-free folks rejoice—swap regular gingersnaps for GF versions like Mi-Del. Additionally, use dairy-free cream cheese and coconut cream for lighter twists. Because these swaps keep the rich taste intact, your pumpkin cheesecake with gingersnap crust welcomes everyone to the table. In short, experiment freely for inclusive holiday magic.
Make-Ahead, Freezer, and Holiday Planning Tips
How Far in Advance to Bake Pumpkin Cheesecake for Events
Planning ahead rocks for holidays. Consequently, bake pumpkin cheesecake 2-3 days early—it tastes even better after flavors marry in the fridge. Moreover, wrap tightly to lock in freshness. As a result, you free up Thanksgiving Day for turkey stress instead.
Freezing Whole Cheesecakes and Individual Slices with Best Results
Freezing works wonders for pumpkin cheesecake. First, chill fully, then wrap the whole thing or slices in plastic and foil. Freeze up to 2 months, thawing slowly in the fridge. Therefore, the gingersnap crust stays crisp, and the filling holds its creamy charm—no soggy fails here.
Planning Dessert Menus: Pairing with Other Fall Sweets and Drinks
Pair your pumpkin cheesecake with gingersnap crust with apple crisp or pecan pie for variety. Additionally, hot cider or pumpkin spice lattes cut the richness perfectly. In fact, these combos make your spread a fall hit that wows every guest.
FAQs – Pumpkin Cheesecake with Gingersnap Crust
How Do You Keep Pumpkin Cheesecake from Cracking?
Cracks sneak up on pumpkin cheesecake from quick temperature shifts or too much air in the batter. Therefore, mix on low speed, tap out bubbles, and bake in a water bath for steady heat. Additionally, cool slowly in the oven with the door cracked—let it chill overnight for a flawless top every time.
Do You Need a Water Bath for Pumpkin Cheesecake with Gingersnap Crust?
A water bath isn’t always a must, but it works wonders for smooth results. Consequently, it keeps steam around the pan so edges don’t overcook before the center sets. However, if you skip it, lower the oven temp to 325°F and place a pan of water on the rack below. As a result, your pumpkin cheesecake with gingersnap crust stays crack-free either way.
Can Pumpkin Cheesecake Be Made Ahead and Frozen?
Absolutely—pumpkin cheesecake shines when planned ahead. First, bake and chill fully, then wrap tightly in plastic and foil for the freezer up to 2-3 months. Moreover, thaw in the fridge overnight so the gingersnap crust stays crisp. Therefore, it’s a holiday hero that frees up your busy schedule.
How Long Does Pumpkin Cheesecake Last in the Fridge?
Stored right, pumpkin cheesecake keeps fresh in the fridge for 5-7 days. Simply cover with plastic wrap or pop it in an airtight container. However, for best taste, enjoy within 4 days before flavors shift. In short, leftovers make great mid-week treats!
Can You Make Pumpkin Cheesecake without a Springform Pan?
No springform? No problem for pumpkin cheesecake. Use a deep pie dish or muffin tins for minis—just adjust bake time. Additionally, line with parchment overhangs for easy removal. Thus, the gingersnap crust and filling work just as well in any shape.
How to Adapt Pumpkin Cheesecake with Gingersnap Crust for Gluten-Free Guests
Swap in gluten-free gingersnaps and cream cheese—no other changes needed. Consequently, brands like Mi-Del keep the spice punch. Moreover, use GF flour if adding nuts to the crust. As a result, everyone digs into this inclusive pumpkin cheesecake delight.
Related Posts

 Ultimate Brownie Caramel Cheesecake Guide
 Cinnamon Pastries: Flaky Delights and Sweet Traditions